

Starting to date
i'm back
I’m over here writing my book and chipping away at the new Bread on Earth website so it follows that the substack mind virus would come and drag me in. I actually think I love it if only for the endless character allowance (you’ll see), though I think it might send some rogue emails supposedly on my behalf. Sorry about that in advance...Next time I’ll pause and give a little re-intro, but for now I’m going to get right into a recipe. Scroll down to the pic of a loaf being smushed by its pedestal of field guides if you don’t care for context.
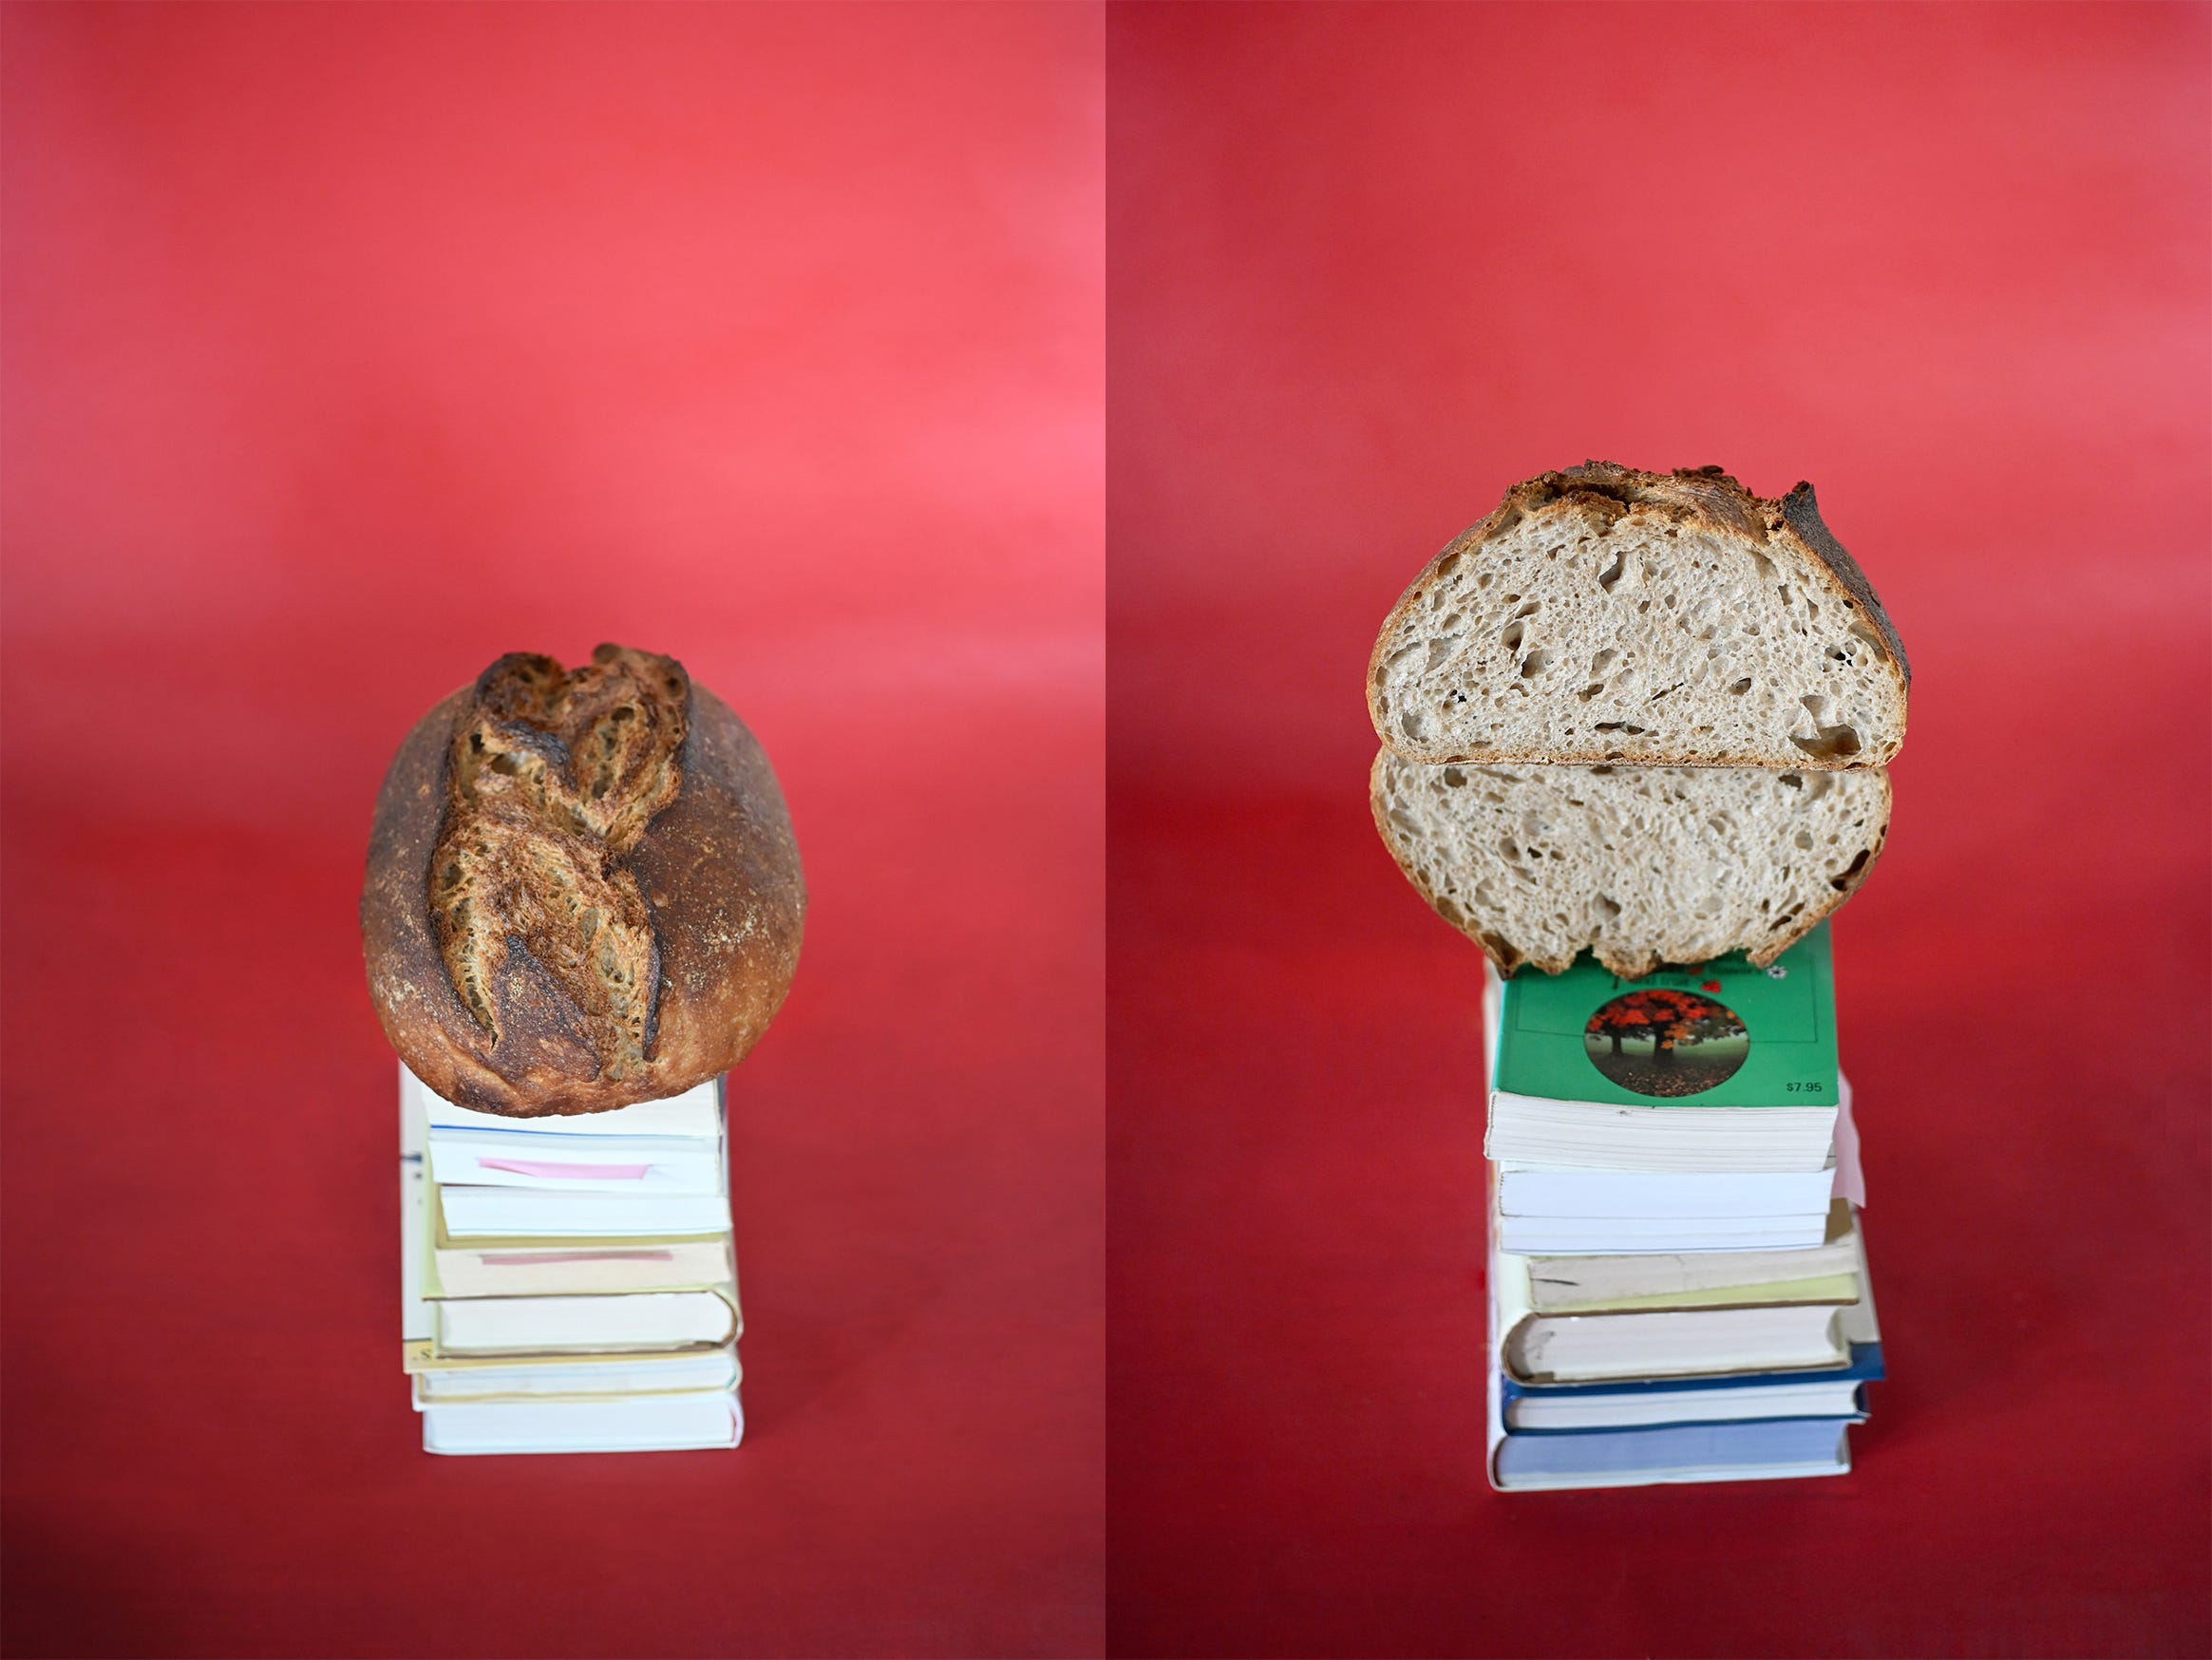
a loaf leavened exclusively with date-steeped water, recipe down below
I, like much of the western bread baking cult, am an avid sourdough enthusiast. My affection is motivated by practical things like improved digestibility, nutrient-availability, the keeping quality of the loaf, the chew, the depth of flavor. I like that the pace of it matches our own biorhythms and that it forces me to pay attention. When all is going well I feed my sourdough, Barthelme, at least once but often twice a day, a ritual that genuinely helps to keep me from slipping into the centrifugal numbness.
But it is needy. Not like having a dog, but a fish maybe. And I had a fish once. His name was Feldspar and he was a goldfish I carried home on the subway from a photoshoot where he was being used as a prop (I was photographed while holding him suspended in a martini glass, sadly the photo never surfaced) with no thought to his life after wrap. My altruism was short-lived and, likely due to my negligence, he ended up with a bowel disorder that made him float on the surface of the water sideways like an errant balloon (the internet-sold remedy was to, impossibly, feed him a bit of mashed pea). Eventually he sank to the bottom of his tank, chronically unable to do the one thing he was really born to do. Swim! See, it did not go well for us. I do love my sourdough and keep it going just fine, I’m just saying it’s not nothing. Sometimes I need a break - I already have two actual children. The endless feeds, the endless discard. Obviously there are as many uses for this discard, but it can, I admit, feel like a chore.
It’s also curious to me that this is the only form of natural leavening in wide use, even by hobbyists. There are yeasts and bacteria everywhere, and dough is a substrate primed to help them along. Of course there are other ways of turning it on. Years ago I became enamored with the process of building a starter using only fruit and water, a concoction called “yeast water” by many contemporary bread enthusiasts, but - maybe it was the nauseating terminology, maybe it was the seeming redundancy of the product - I didn’t get to it until about 9 months ago. Since then I’ve been tempted to retire my sourdough practice altogether, I am so obsessed with the efficacy, clarity, neutrality of this method.
I can’t, however, call it “yeast water”. It just has no chutzpa, and in part I blame this name for the stunting of its revival. I’ve been going with “wild water” though it feels a little audacious and I’ve yet to be able to say it out loud. Naming conventions and quippy monikers feel like very modern afflictions that are born out of an obsession with making everything pristinely sellable, and this stuff might just be immune to it.
Anyway, catching the yeast that live on fruit and vegetable skins has been happening for thousands of years. As you can probably imagine, it was much more popular prior to the invention of commercial yeast in the late 1800s, which swiftly homogenized the culture of cultures. Pliny wrote about the process 2000 years ago, the ancient civilizations of Iraq - we’re talking Babylon, Sumer, Uruk, and others - used dates to raise breads like sour khobz, aka khubez tamer or khubz ahmar1, which is still made in southern Iraq, Bahrain, Saudi Arabia, and other parts of the Arabian Peninsula. There’s also mosbolletjies, a South African bread that used grape must as a leavening agent before it was replaced by commercial alternatives. Rēwena paraoa, a flatbread made by the Māori, is leavened with a sweet potato starter, and in Morocco some bakers use garlic to inoculate their dough. But contemporary bread culture is soaked through with European ticks, and there sourdough reigns supreme. It’s a formidable coalition to contend with. This fruit-steeped water is nothing new (I imagine it’s all over tiktok, though I’ve never been on tiktok so this is a hunch), but it’s still, I think, unduly sidelined.
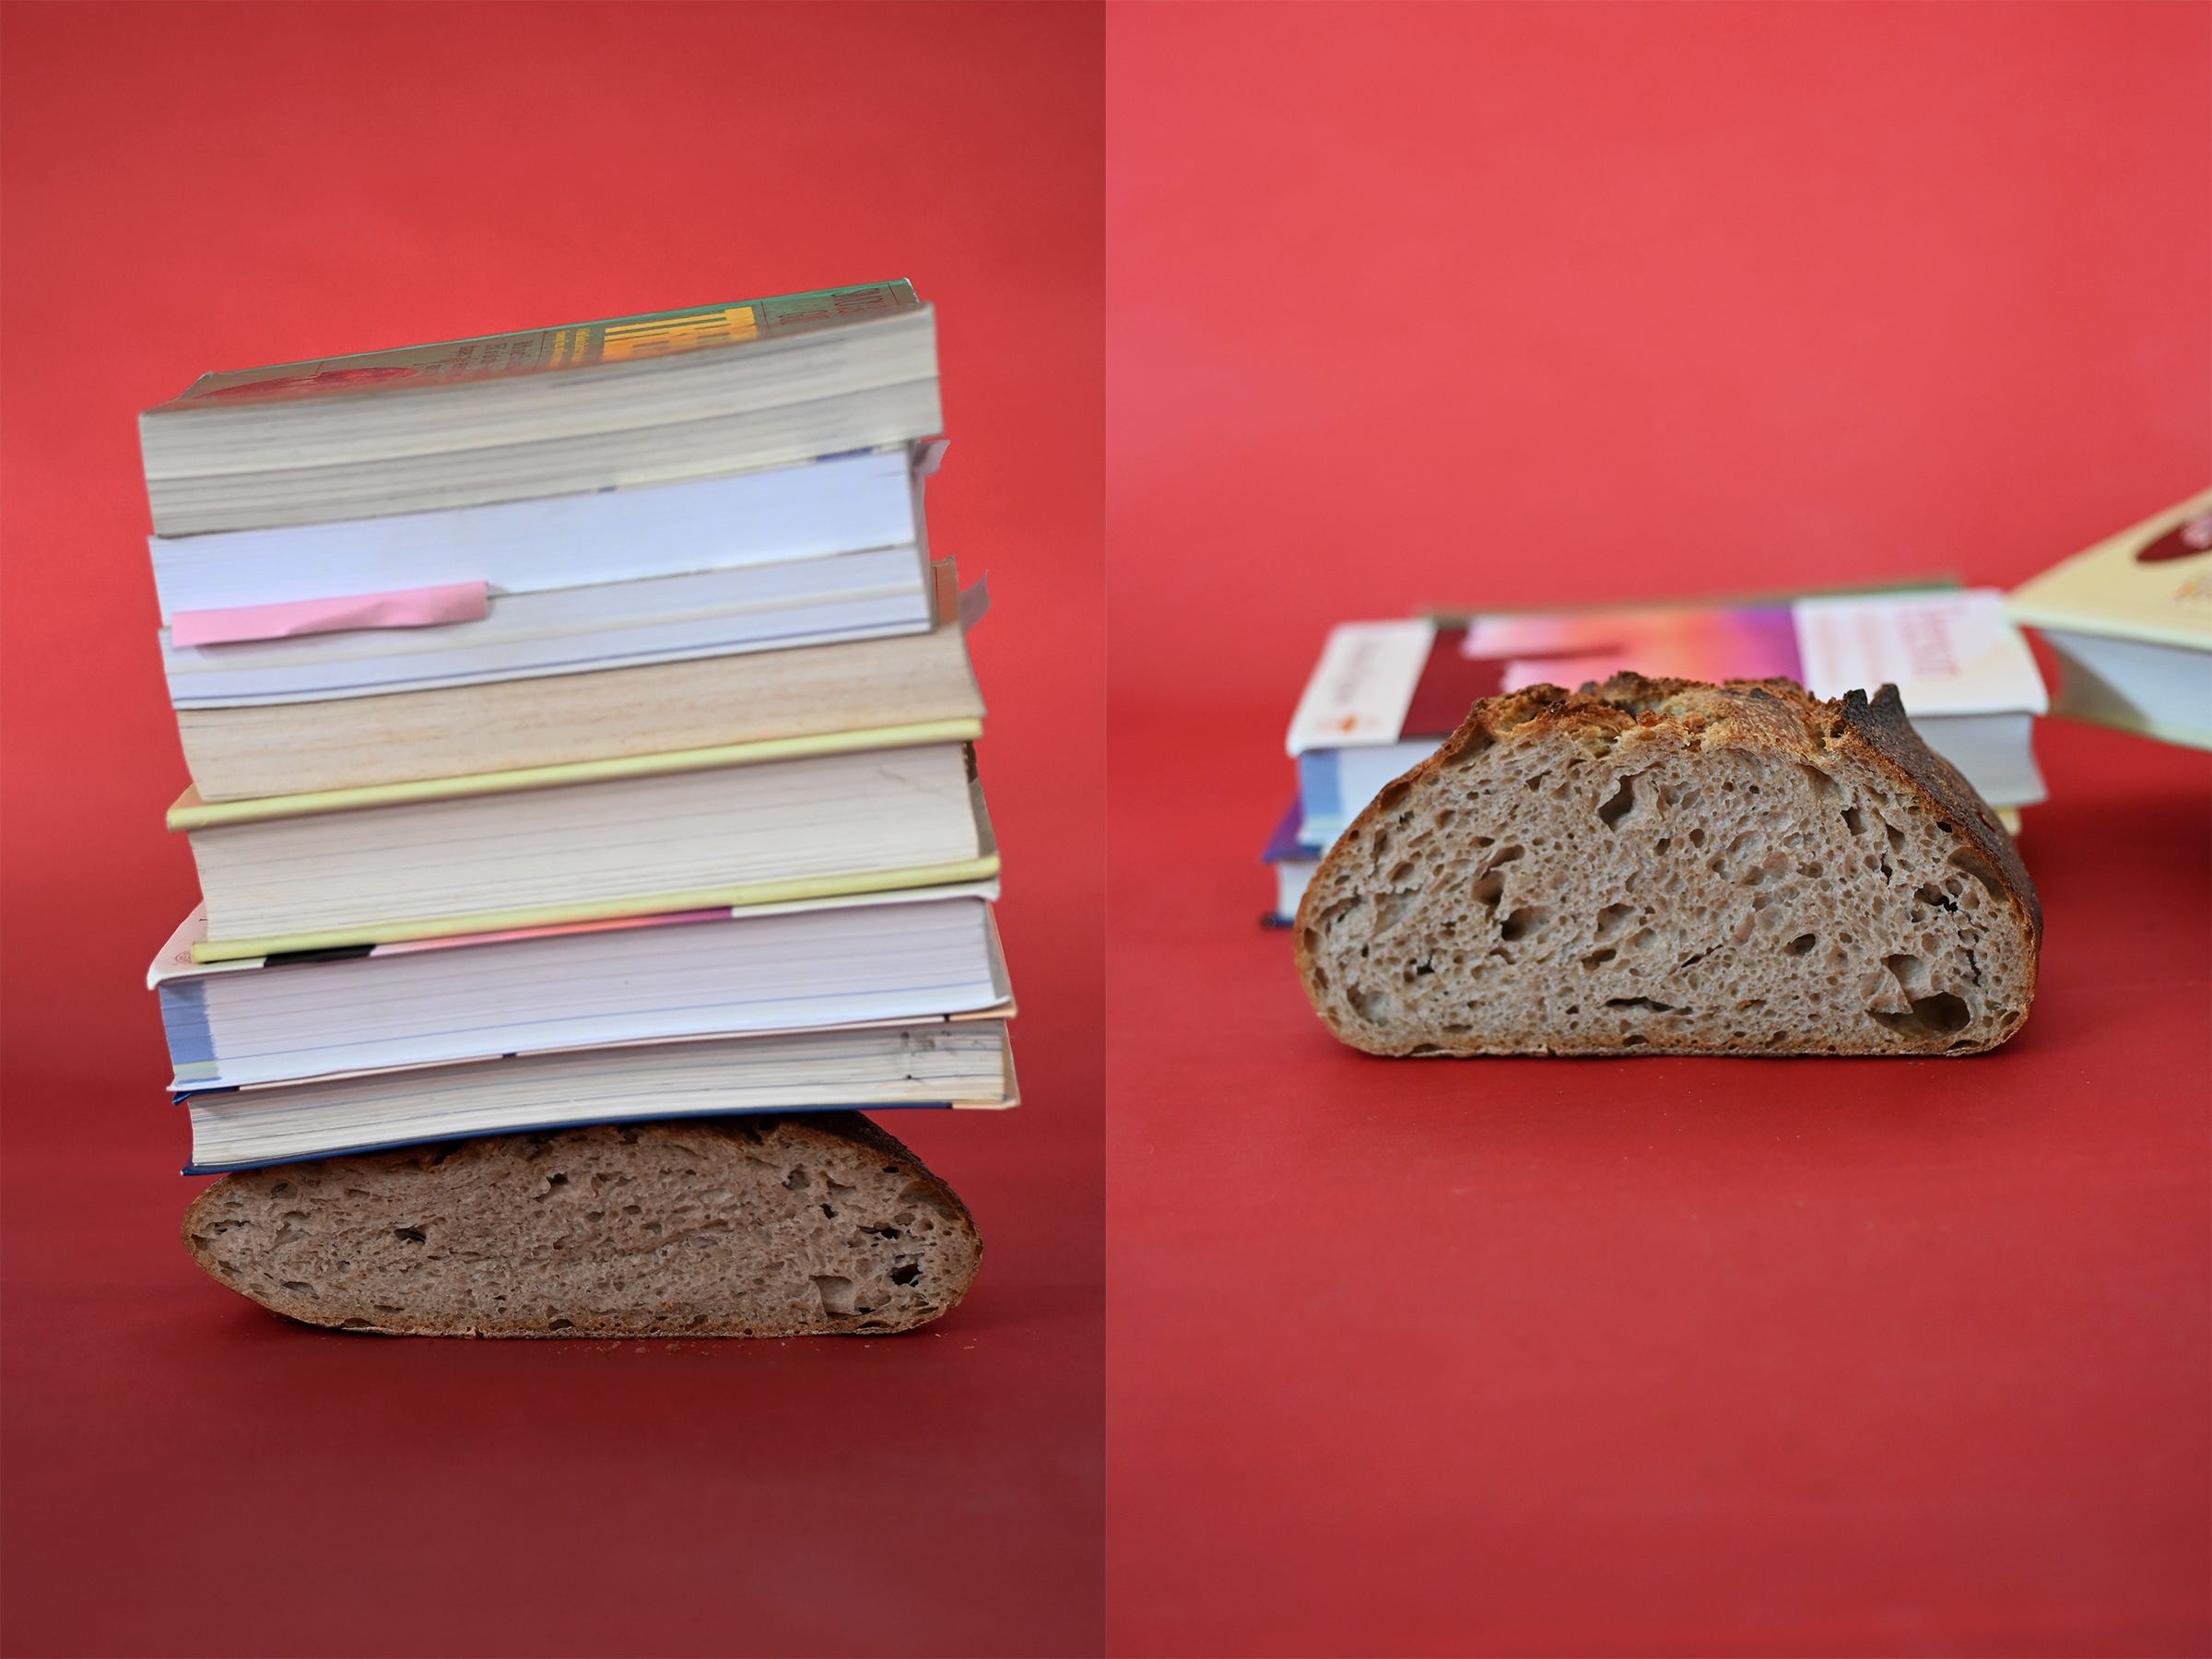
So for those who cannot or wish not to keep a sourdough going, or who just want a little jaunt with something old made new again, giddy up. This leavening method makes for a barely-there tang that’s more like yogurt than vinegar. This is the result of a comparatively smaller community of lactobacillus, the bacteria responsible for the organic acids that provide that pungent sour flavor in sourdough breads. Some have voiced concerns about losing the preservative effects of those little bugs, though I find this mostly unfounded - the bread still keeps for days and is able to ferment for a long, long time without the dough breaking down or becoming overly sour (I’ve let it cold proof for over 28 hours with barely a tang at the end). This makes the crumb especially glossy and tender and pliable after baking, as evidenced by the smoosh test:
Now, here’s what we’re going to do: make the date water, then we’ll make a preferment with it, then we’ll mix that into a dough and bake a loaf. Depending on the conditions you’re working in, this whole thing could take as little as four days or up to two weeks. Better get started.
Make the Date Water
A note on ingredients: I consistently use medjool dates, but other kinds of dates work great, as do raisins, dried cherries, apricots, figs, or other dried fruits with a high sugar content. Use organic when possible. Fresh fruit is absolutely an option (grapes, apples, and pineapple are common choices), though it benefits from a bit of honey or sugar. Tap water can work fine, but use filtered if you have any concerns about the quality of what’s coming out of your faucet.
Be prepared - the time your water takes to ferment will vary widely depending on your ingredients and environmental conditions, but once it’s going it lasts. I’ve had success using date and raisin waters as old as 6 months.
YIELD
Enough for about 10 loaves of bread
INGREDIENTS
500g water, warm
95g (or about 4 large) organic dates
HOW TO
Combine the water and dates in a large clean glass jar, something around 32oz.
Every morning and night until the fruit float: Shake the jar and release the pressure by opening and closing the cap. In ideal conditions (a pre-existing fermentation practice, good water, lively fruit, a warm room, etc.) this may take as little as three days. In less ideal conditions it may take two weeks. If you’re feeling impatient, add a teaspoon or two of sugar or honey to the jar.
The starter is strong enough to raise bread when the fruit is suspended in a sea of fine bubbles, the mixture fizzles and pops when agitated, bubbles rise from the base of the jar to the surface of the liquid, and the mixture smells like a light and fruity beer or kombucha. All these boxes may not be checked by the time the fruit floats, so give it a few extra days at room temperature (with shakes and burps) for it to become truly active, if necessary.
If you’re not sure it’s ready, try making a preferment using the directions below. The speed of these starters varies, but it should take 8-12 hours in a cozy room to ripen fully. If it’s taking longer than that, you may be using your date water prematurely.
Once active, store in a very cold spot in the fridge and pull from the jar as needed.
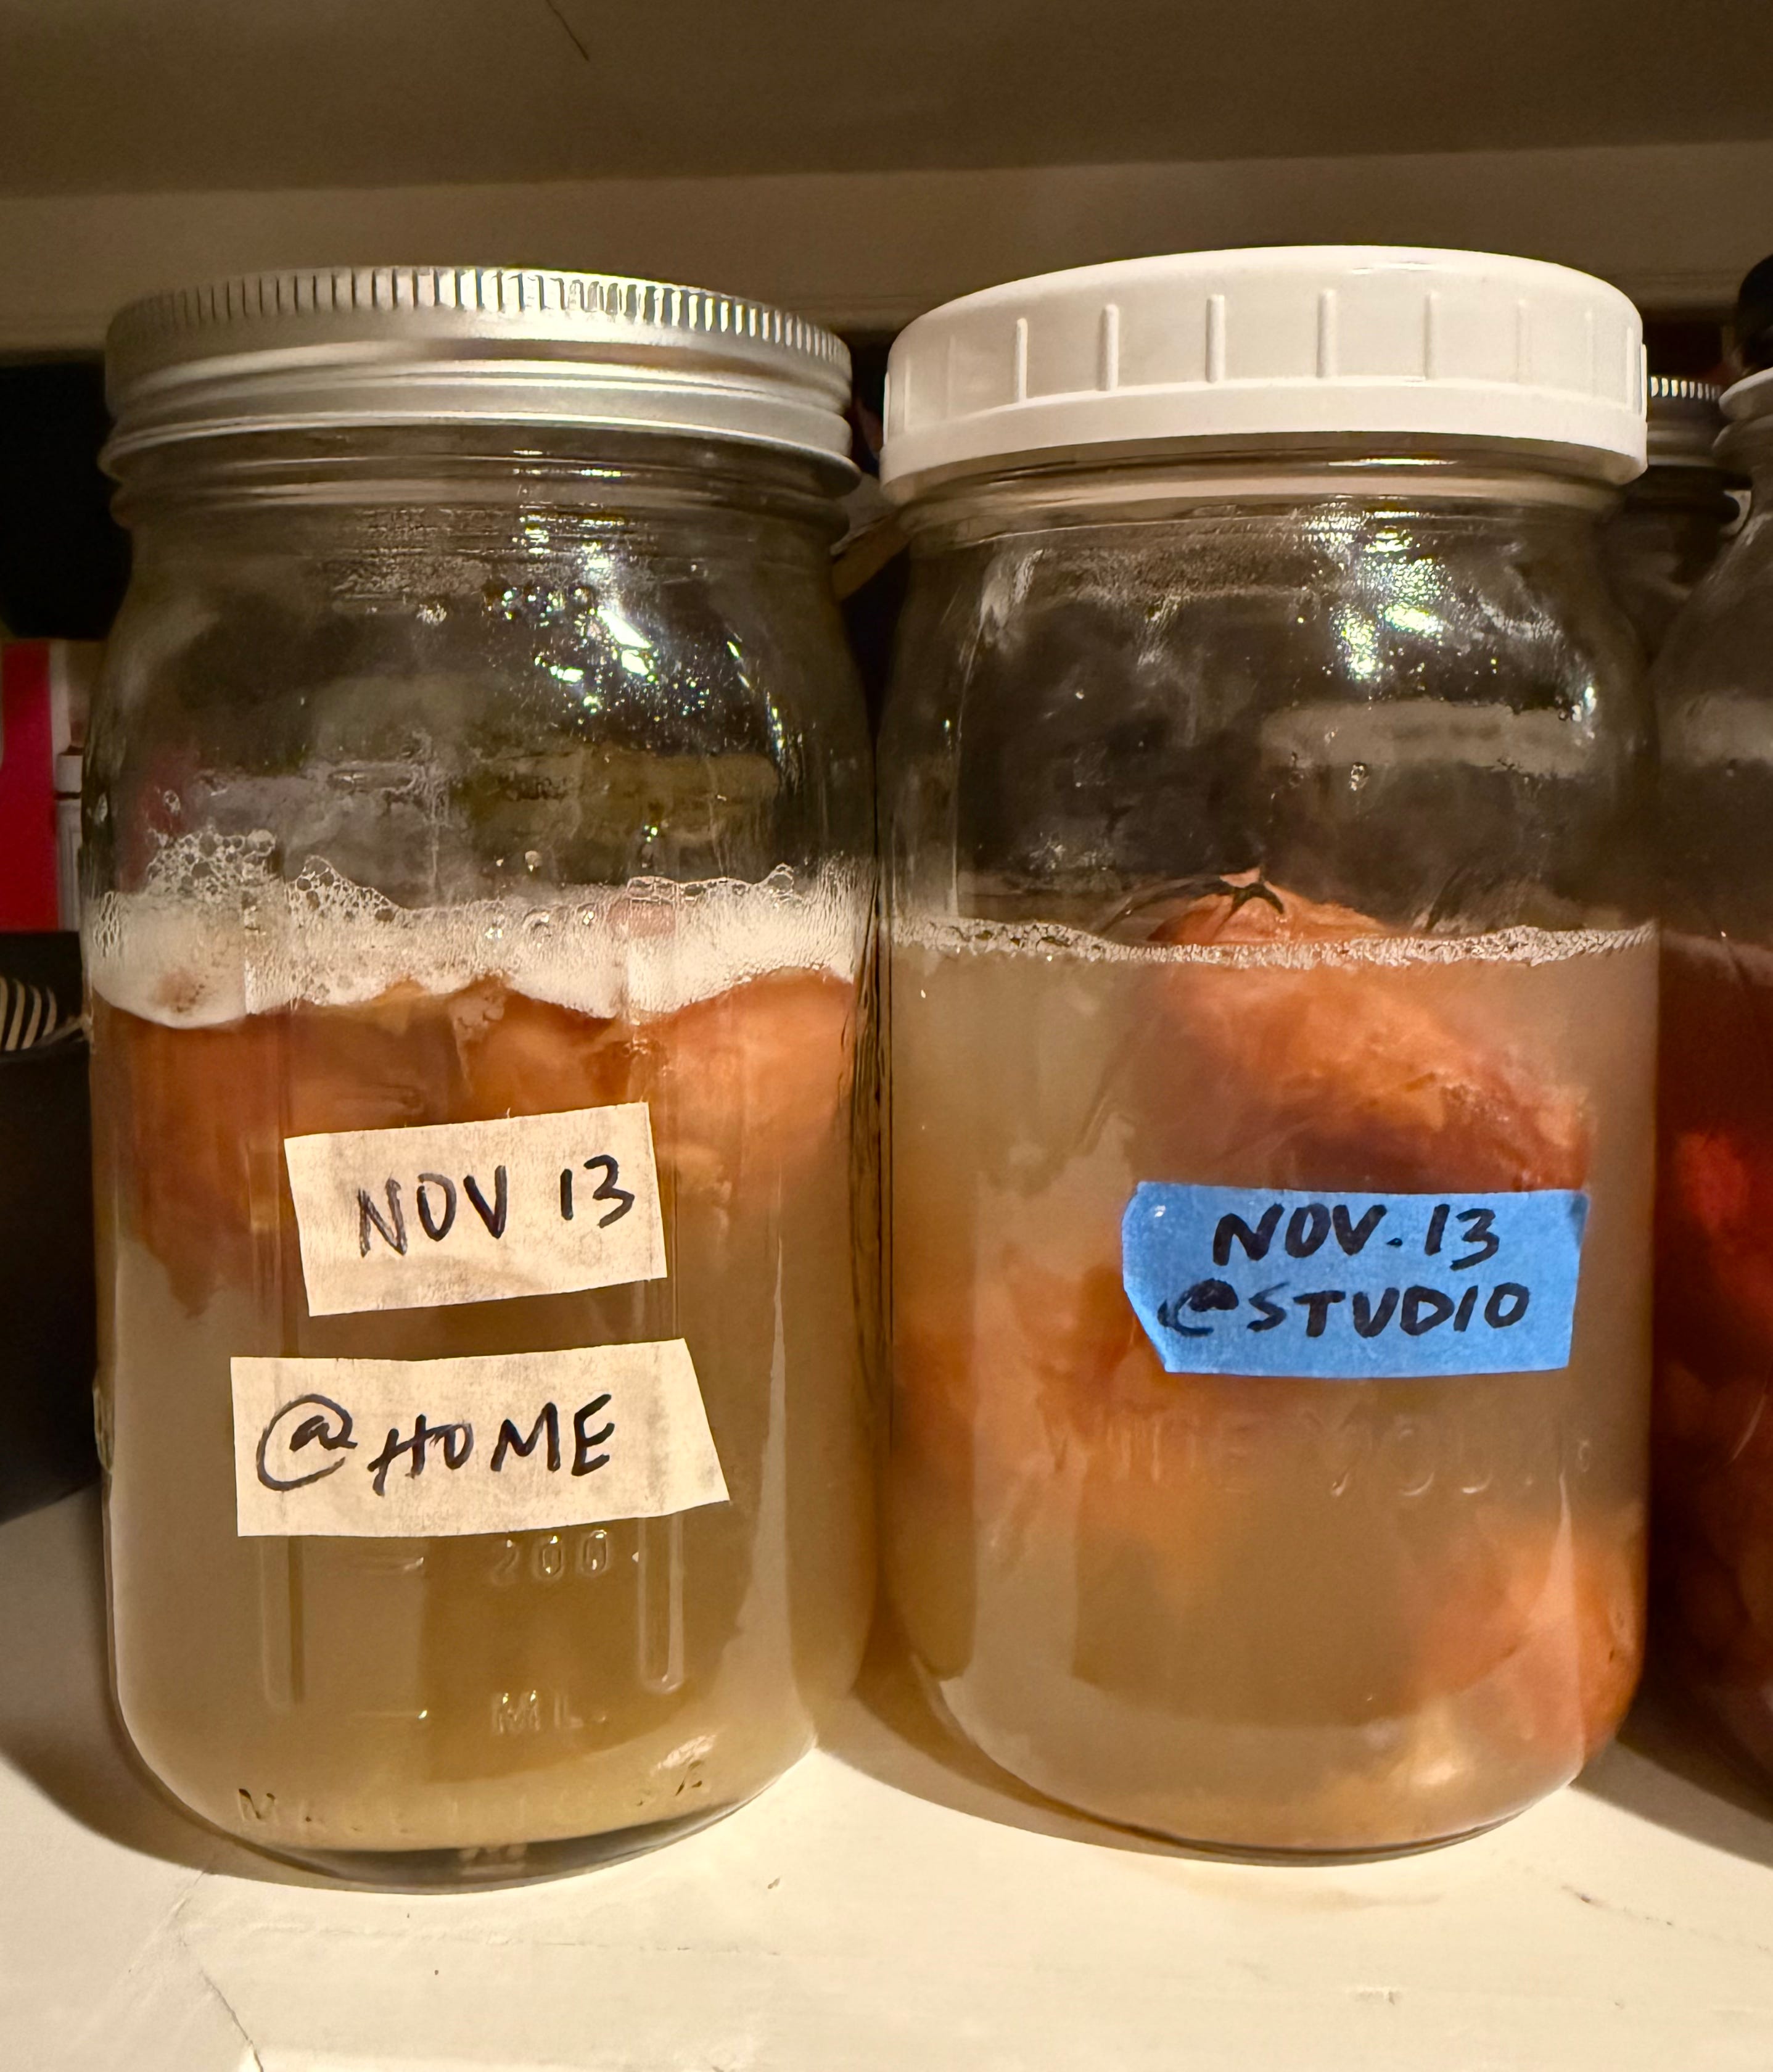
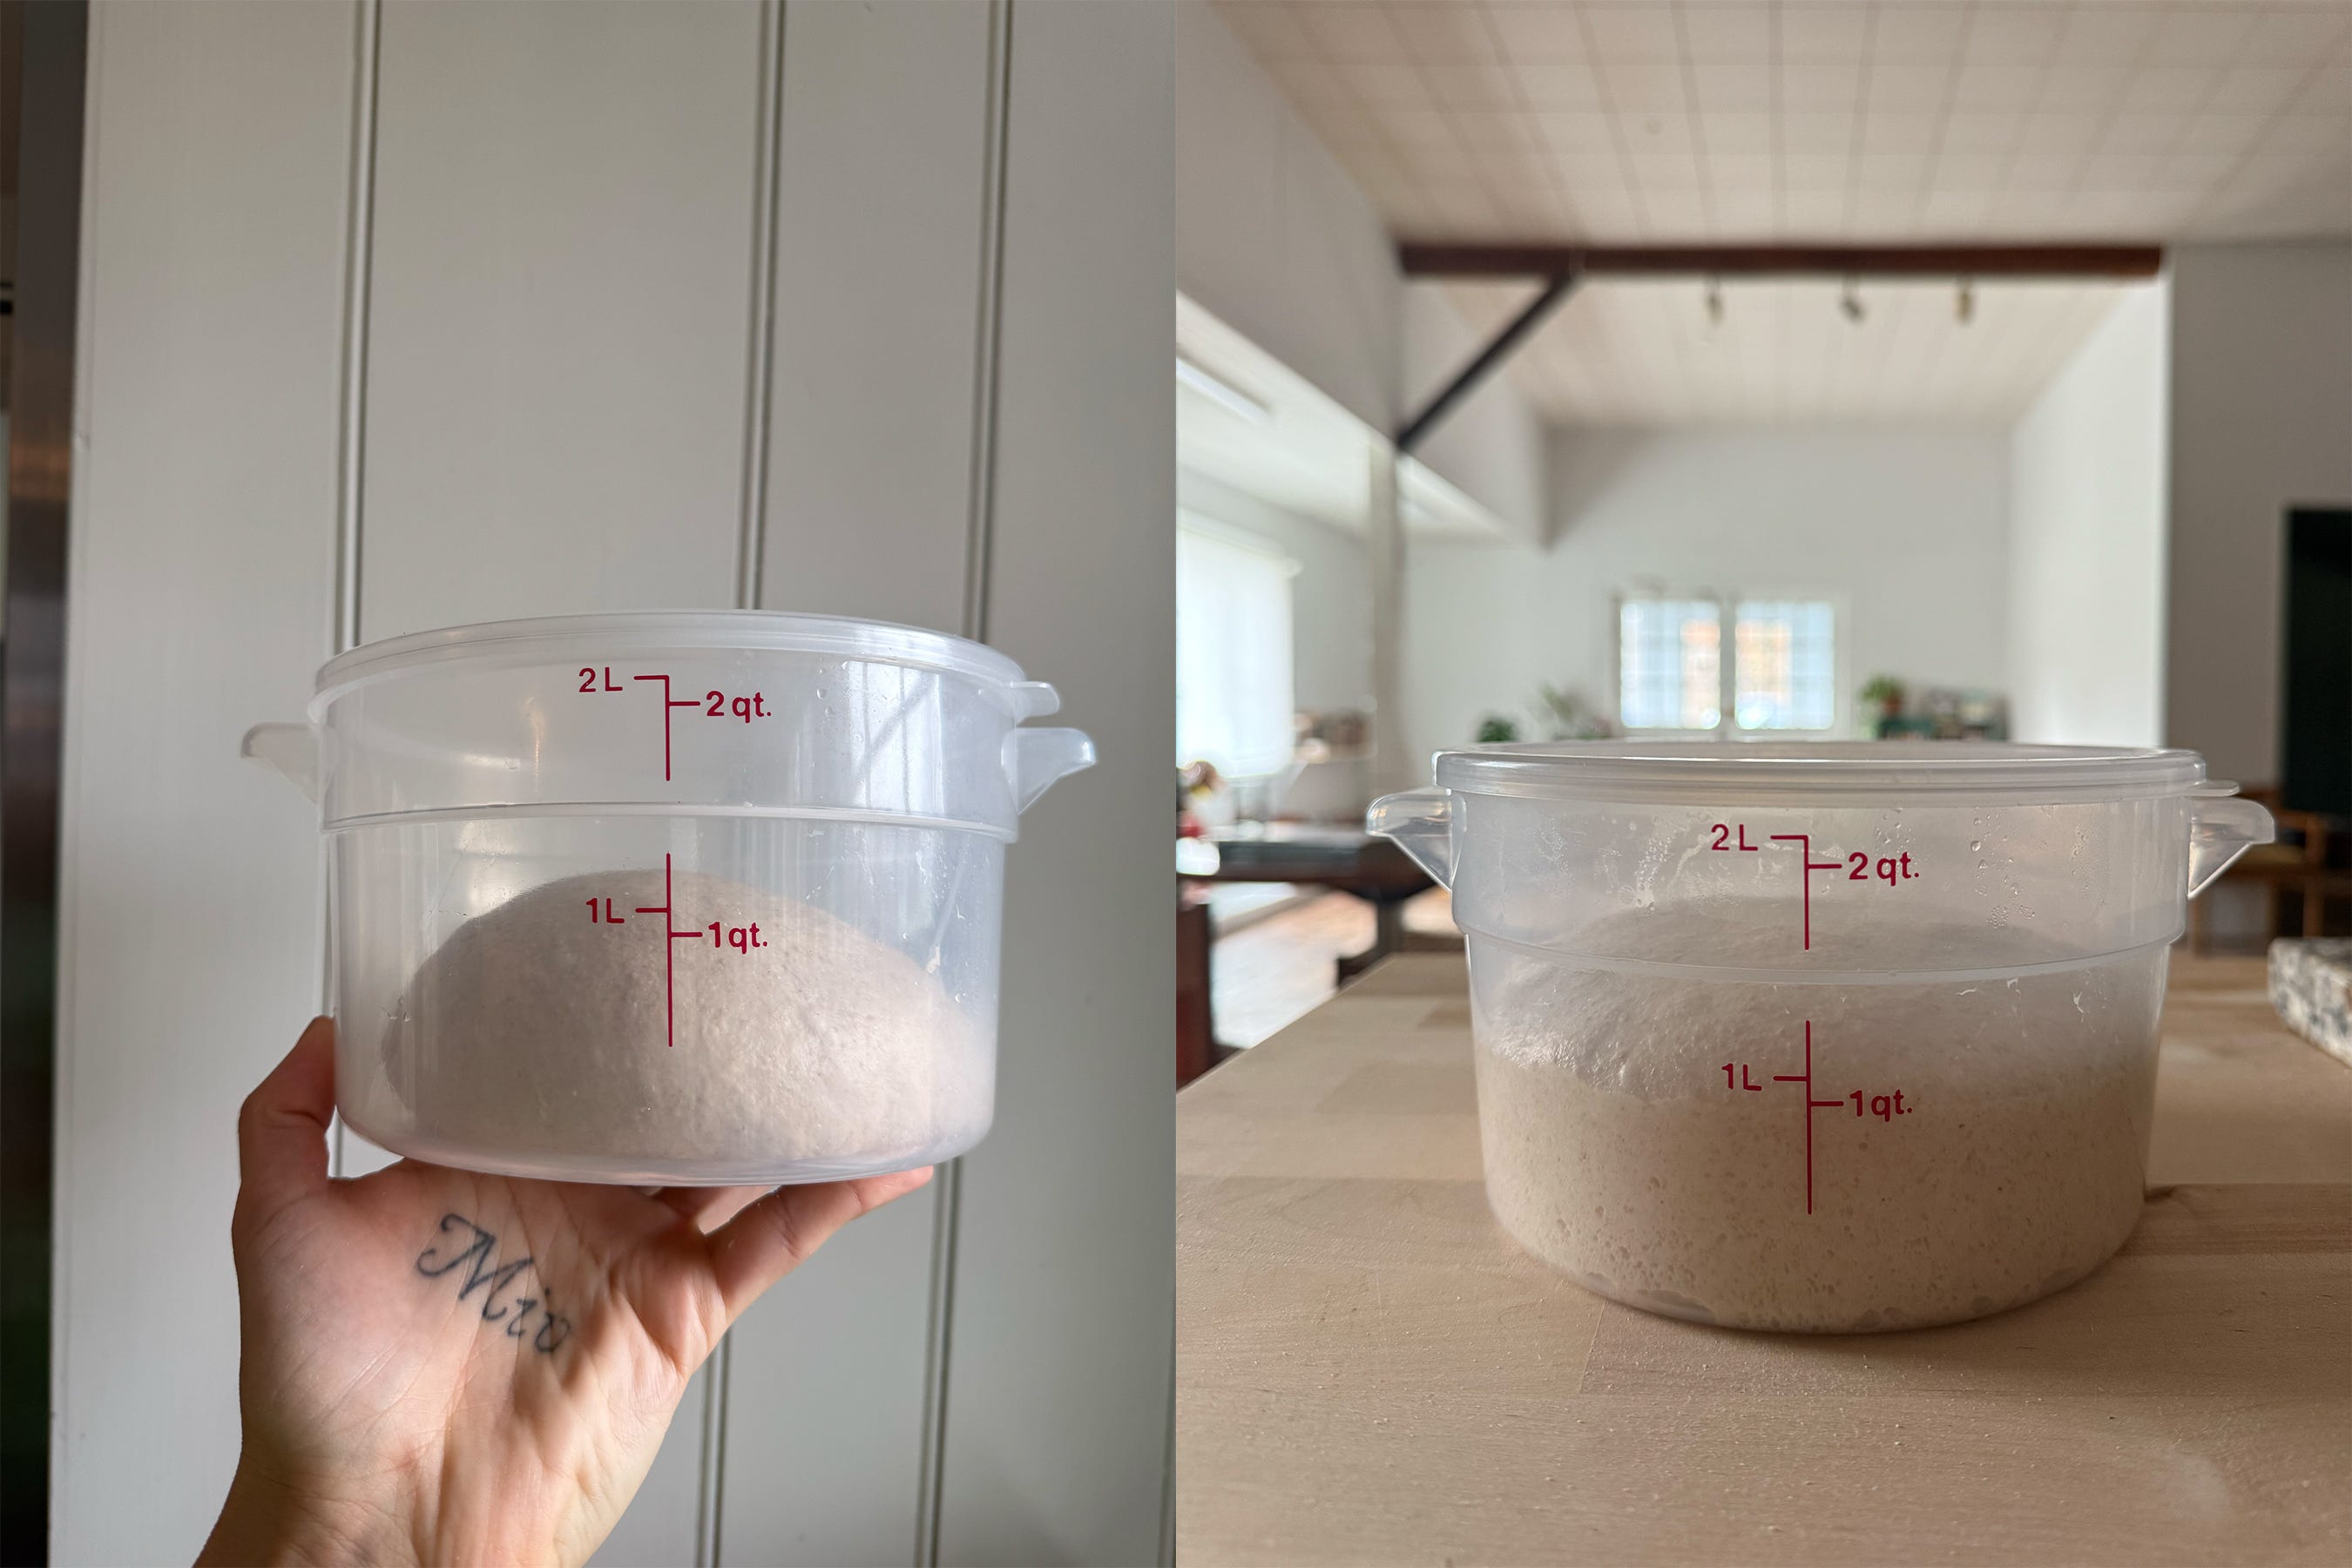
speed of fermentation varies: 3 day old water mixed in a home kitchen with pre-existing fermentation practice (left) vs water mixed in an empty studio space (right)
REBUILDING
When you have an inch or two of liquid left in the jar, scoop out the fruit2 (don’t pour the mixture through a strainer, you want the muck at the bottom to remain) and fill the jar back up with water (about 400g if you’re measuring). Add another 2 or 3 dates and a little honey if you want, shake it up, and let it sit on the counter for a couple days, burping and shaking once a day. When it’s very fizzy again, put it back in the fridge. Repeat this indefinitely.
Make the Preferment
Natural fermentation of any kind requires time, so you’ll still have to allot a couple days to the mixing and baking process. Plan to mix the preferment before going to bed, mix the dough the next morning, then bake the morning after that.
For example, if you want to have a fresh loaf of bread on Sunday: Mix the preferment on Friday night (5 mins), make the dough on Saturday morning (5 hours total, mostly hands-off time), and bake on Sunday morning (1 hour 45 mins, hands-off).
This preferment makes enough for the bread recipe that follows it, but you can build a date water preferment to replace sourdough in any recipe by taking the weight of the final levain and dividing it in two, then using those measurements here instead.
YIELD
preferment for 1 loaf
INGREDIENTS
40g active date water, fresh or from the refrigerator
40g all-purpose or whole wheat flour
HOW TO
The night before you plan to mix your dough, remove your jar of date water from the fridge and give it a vigorous shake - you want that layer of gunk on the bottom to be re-incorporated. Place a small bowl on a scale and put a strainer on top of it, then zero-out the scale and measure the date water into the bowl. Remove the strainer and add the flour, then mix well with your hands or a spatula. Place the slop into a jar with room for it to triple. Put a rubber band around the jar to mark the top, cover loosely with a lid, then leave it somewhere warm overnight.
You’ll know your preferment is ready to use when it has at least doubled (or possibly tripled), has small bubbles throughout, and has just begun to flatten on top. If you’re using all-purpose flour instead of whole wheat, the surface will be slightly dimpled and you may see some bubbles breaking through. Whole wheat tends to stay more firm and may not rise quite as much.
Make the Bread
This is a recipe for a basic levain-style loaf, but your preferment can really replace sourdough (or commercial yeast, theoretically) in anything. Consider using it wherever you normally want to avoid a strong tang.
Note on ingredients: I always recommend using the best flour you can find, ideally stoneground and recently milled. For consistency’s sake, I use Farmer Ground Flour to test my recipes. But just do what you can with what you have.
For those who like bread formulas (:-*), scroll all the way down.
YIELD
1 loaf
INGREDIENTS
Preferment
40g whole wheat flour
40g active date water, room temperature
Final Dough
90g whole wheat flour
360g all-purpose flour
345g water A, warm
all of the date water preferment (you’ll have about 77g)
10g salt (kosher is best)
10g water B
HOW TO
Mix your preferment
8-12 hours before you plan to mix your dough, make your preferment using the instructions found in the section above.
Fermentolyse
(This is just an internet-y term for mixing everything together except the salt and sometimes a portion of water. It helps to hydrate and build strength in the dough, making it easier to mix.) Once doubled, mix the preferment, warm water A, all-purpose flour, and whole wheat flour in a bowl. Use your hand to mix until well-combined; don’t overthink it. Jot down the time somewhere. Cover the bowl and set a timer for 15 minutes.
Mix your dough
When you return, add the salt and sprinkle some of the water B on top. Using a wet hand, squish the dough in the bowl a few times until it’s well combined and the salt is imperceptible, letting it ooze out from between your fingers, then swoop the whole mass out of the bowl and onto a clean countertop. Now you’re going to slap-and-fold the dough for about 7 minutes (video below), until it grows strong enough to stop tearing with each turn. Add the remaining water as you go (be brave, but if your flour is weak and you’re new to this it may feel unmanageable - just hold some back). This mix takes some time but it’s very satisfying to watch it buff up right before your eyes, and it pays off later. It’s also the only real work that goes into the loaf.
Try to tuck the dough into a nice ball, then return it to the bowl and cover. Put it in a warm spot, like the oven with a light on or with a bowl of hot water inside. I think the microwave should work too, but I haven’t had one in 20 years.
Slapping and folding is basically just: wet hands on either side of the dough, scoop, flip up, slap down, fold over. Move with confidence and grace will find you my friends.
Bulk fermentation
Your dough will now hang out for about 4.5 hours. You’ll do 4 coil folds (video below), one every 30 minutes for the first 2 hours (taking notes helps keep track of the schedule). After your last fold, put the bowl back in its cozy spot and set a timer for 2.5 hours. Ideally you want the dough to be around 78F throughout this process. If it’s significantly lower just plan on increasing this fermentation period by 30-60 minutes, or until the dough seems lively and relaxed, and has about doubled. If you’re used to working with sourdough, I find this dough tends to move just a bit slower.
Above, a coil fold.
Left: immediately after the 3rd fold; Right: 2.5 hours later, at the end of bulk fermentation
Pre-shape and shape
Once your dough has about doubled and is very relaxed and wiggly, you’re ready to pre-shape and shape your dough. See the videos below for my methods for both, though the internet is full of other people’s valid opinions on them. Leave your pre-shaped dough uncovered for 30-45 minutes before shaping. If you don’t have a proofing basket / banneton, use a bowl draped with a kitchen towel that’s been dusted with flour. I’m not into scoring right now, so I put my shaped loaf seam-side down in the banneton and let it burst on its own when baking, though you can rest the loaf seam side up if you like to slice the dough with a razor before it goes in the oven.
As you can see, the dough is very alive - so much so that I have to pop some still-standing bubbles after shaping.
Cold proof
Place in the fridge (around 39-40F ideally) for at least 18 hours. I don’t cover my sleeping loaves, but if you want you can rest a kitchen towel over yours before it goes night night.
Baking your bread
An hour before you want to bake, remove your shaped loaf from the fridge. It should feel a bit inflated but still springy when poked. Let it sit on the counter to finish its proof. By the time you bake, you should see a bit of added rise and less resistance to your finger.
Preheat your oven to 500F with a dutch oven inside. Once it’s been up to temp for about 10 mins, gather 2 or 3 ice cubes and a piece of parchment paper a bit larger than the footprint of your proofing basket. Remove the dutch oven from the oven (carefully) and place on a heatproof surface. Beside it, invert the loaf onto the parchment paper and dust off any excess flour. Lift it into the hot pot and drop your ice under the corners of the parchment. Cover the pot quickly and return it to the oven. Turn the heat down to 475F and bake for 20 minutes. Remove the top of the dutch oven and bake for 20 mins more. Lastly, take the loaf from the pot, remove the parchment, and return it to the oven on its own. Lower the temp to 450F and bake your loaf for 5 more mins, or until nicely browned (color is flavor). Cool on a wire rack for at least an hour, then do whatever you want with it.
FORMULA
80% all-purpose flour
20% whole wheat flour
17% date water preferment
79% water
2.2% salt
Woof. A reminder that any recipes shared here will be free for the next two months and after that they’ll go behind a paywall because, damn.
xxxxxxx
Lexie
I wouldn’t recommend using 100% fine semolina, but definitely try it as a sub for the whole wheat.
Ciao! Do you think I can use the same loaf and preferment recipe using semolina rimacinata flour instead of the all purpose/whole wheat? Or I need to alter the recipe all together?